- How to Use the Inventory Feature
- How to Do Full & Partial Refunds
- How to Enter Cash & Checks at In-Person Events & Cash/Check Purchases Online
- Can't Find Our PayPal Account
- How to Take Online Payment through PTBoard at In-Person Events
- How to Fix Can't Checkout Error Message
- Creating a Membership Form
- View & Pay State PTA Feature

How to Use the Inventory Feature
PTBoard has a built-in Inventory Control feature within the Sales Form which will keep an accurate account of your Total Items, Available Items and Items that are Sold or Held in Shopping Carts.
NOTE: You can set up your Sales Form for Guest Checkout if you would like, you just need to make sure to check the box, "Allow guest users to view form and checkout without login" when setting up your Form.
HOW TO SET UP YOUR SALES FORM WITH INVENTORY FEATURE ENABLED:
(1) Create a "Sales Form."
(2) Add in the information for the main part of the form. For example, you can call the form, "Spiritwear."
(3) Click on "Save & Continue."
(4) Now, you will see "Step 2: Add Item." For example, if you have Spiritwear T-Shirts in your inventory that you would like to sell either in-person or online, you can call the item, "Spiritwear T-Shirts." Then, fill out the information about the Spiritwear T-Shirts that you have available including discounts or images if you would like.
IMPORTANT: If you are setting up sales of items that have different sizes, colors, etc. DO NOT add anything in the Units in Stock box. An example of when you would use the Units in Stock box would be if you are selling spirit magnets that are all the same type or you are selling pencils that are only one style. For items like magnets and pencils as described, you do not need to use the Inventory feature explained below. You can just enter your total numbers of items in “Units in Stock” and fill out the rest of the Form.
ALSO, If you use “Max Units Per Order” (as shown below), this means that YOU ONLY HAVE ONE ITEM FOR PURCHASE AND YOU ARE LIMITING HOW MANY ONE PERSON CAN PURCHASE PER TRANSACTION. This CAN be added in the box shown below.
SCREENSHOT #1:
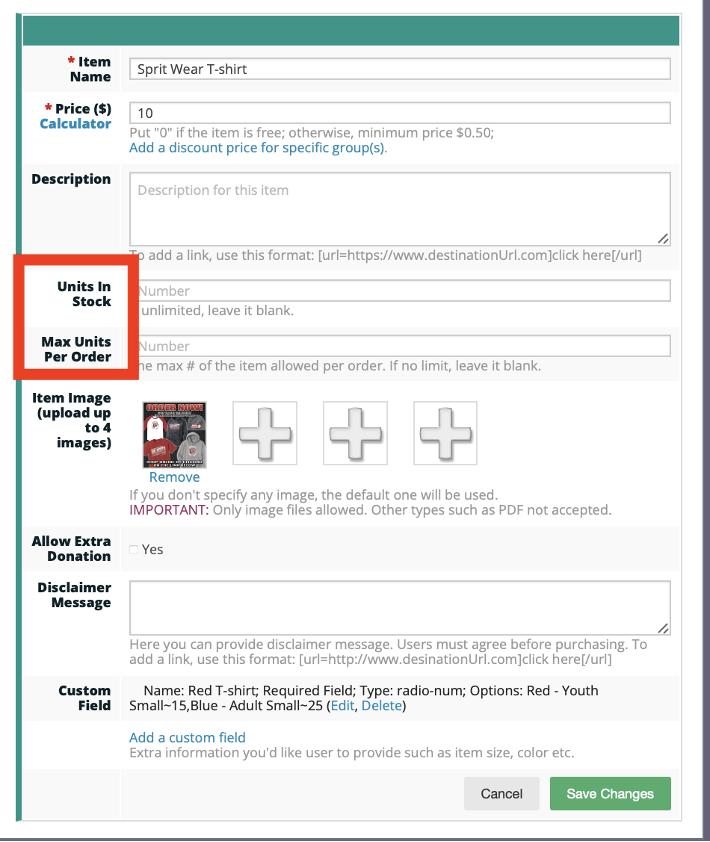
(5) Click on "Add a Custom Field."
SCREENSHOT #2:
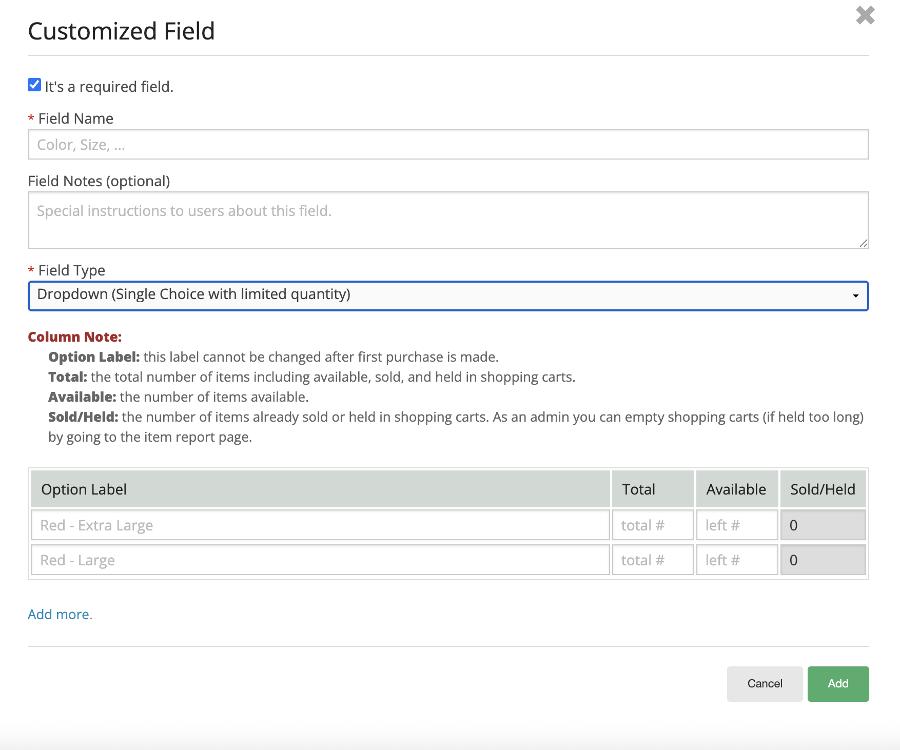
(6) You will add your inventory information here as shown below in SCREENSHOT #3.
- Make sure "It's a Required Field" is checked.
- In "Field Name," add in the name of your item for sale. For example, "Spiritwear T-Shirts."
- Add any notes in "Field Notes" if you would like.
IMPORTANT: DO NOT select just the "Dropdown (Single Choice)." The option, "Dropdown (Single Choice) would be for simple questions to gather information. For example, you would choose that option if you are asking parents to pre-order t-shirts and you just need to know what color and/or size that they would like.
- Once you choose the "Dropdown (Single Choice with Limited Quantity)," you will see the following screenshot.
SCREENSHOT #3:
- The "Column Note" section explains each of the labels/tabs.
- All of the columns can be updated at any time EXCEPT the "Sold/Held" column.
- You can also see your inventory "chart" in the "Report" for your Form as shown in SCREENSHOT #8.
- Add as many items as you would like by clicking on "Add an Item."
NOTE: Keep in mind that each "Add Item" is just ONE group of items with the SAME price. If you have additional inventory with different price points, you will just need to add more items. Once you "Save Changes" to an item, you will be able to "Add a New Item."
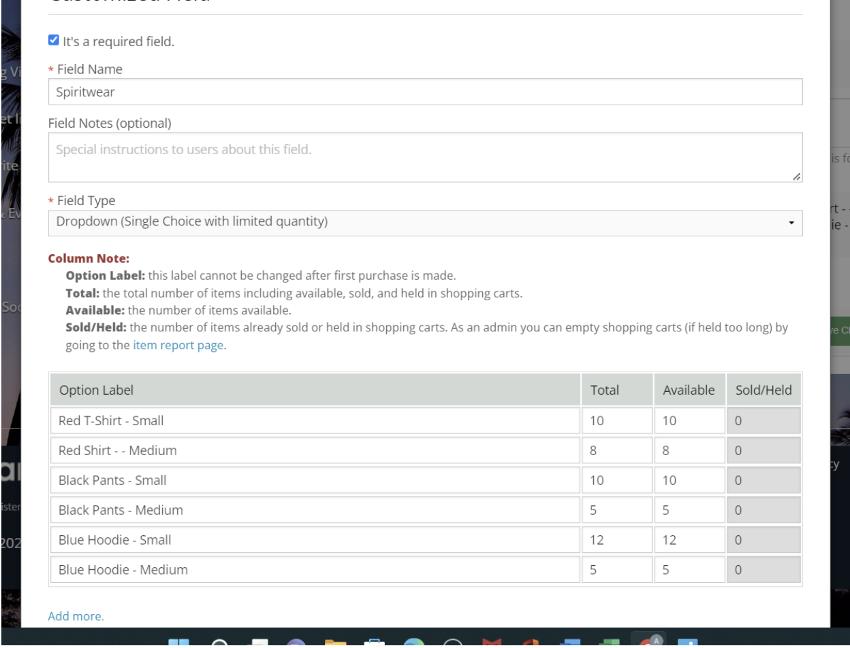
The screenshot below is the same as shown above, but only with "example" inventory added:
SCREENSHOT #4:
(7) Once you have completed your form - be sure to click “Submit” to save your form!
(8) You can then go to “Forms & Payments,” to look at your form and see what a purchaser will see, even when you still have the form in "Draft Mode," as shown below.
SCREENSHOT #5:
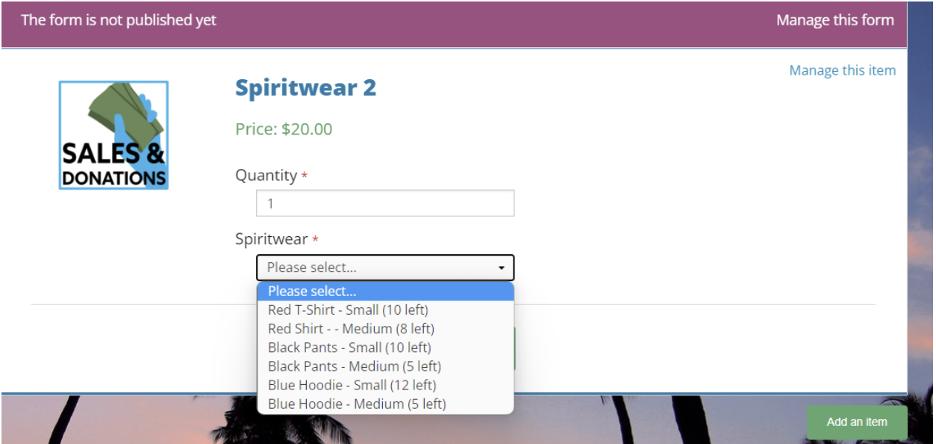
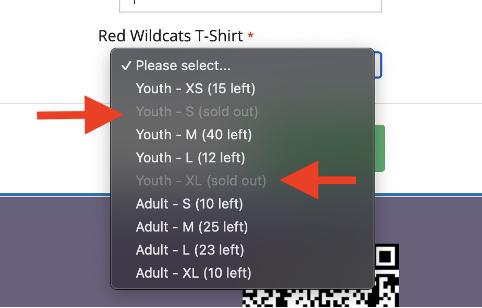
(8) The screenshot below is what a purchaser would see if an item is "Sold Out." The system will NOT let someone make a purchase of an item that is "Sold Out."
SCREENSHOT #6:
HOW TO VIEW THE REPORT FOR YOUR SALES FORM WITH INVENTORY FEATURE ENABLED:
- Click on "Forms & Payments."
- Click on "Manage Form."
- Click on "Manage Form."
- Click on "Report."
- Choose "View by Form/Item."
- Find the Form you want, and click on the "Form Name."
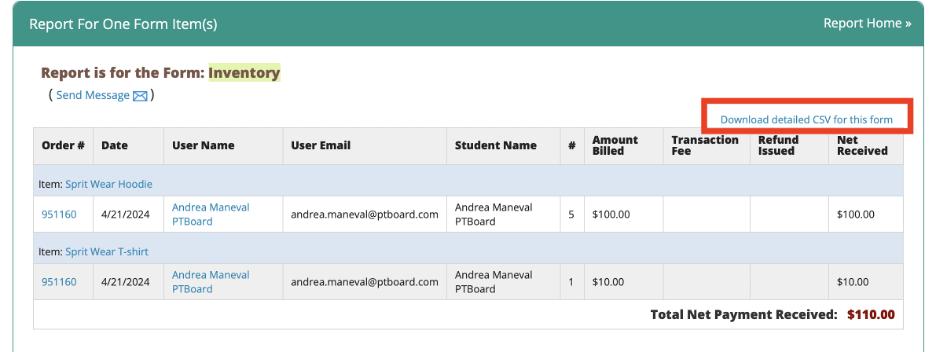
- The screenshot below shows what your "Report" will look like:
SCREENSHOT #7:
-
The view above is the overall view of your Sales Form.
-
In order to look at individual items, click on the Item itself. For example, if you clicked on "Spirit Wear Hoodie" in the above example, this is what you would be able to see:
NOTE: As shown highlighted in the RED box above, you have the ability to “Download a detailed CSV” for the entire form here.
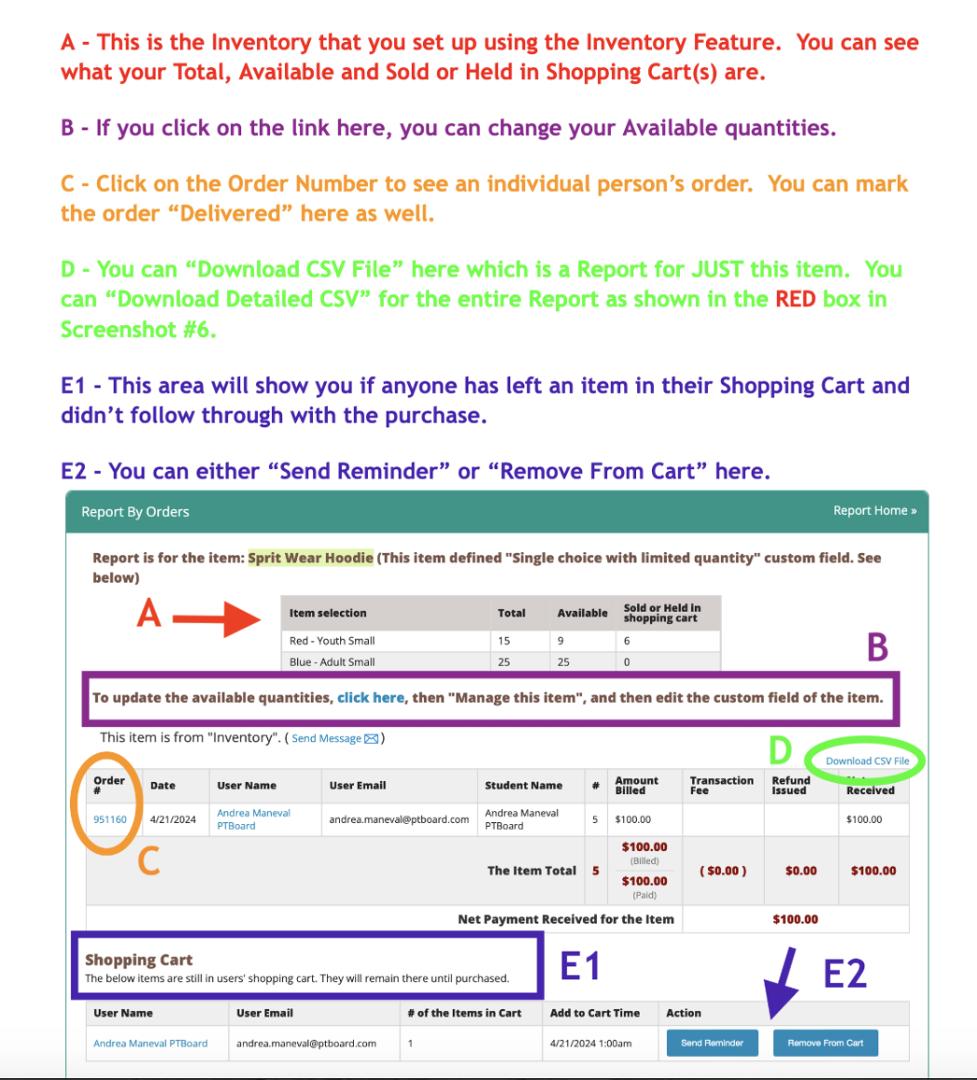
SCREENSHOT #8 (WITH DETAILED EXPLANATION OF EACH FEATURE):
IMPORTANT NOTES ABOUT THE INVENTORY FEATURE:
- If you need to add more inventory of an item, you can always update your "TOTAL" or "AVAILABLE" column either within the "Custom Field" itself or by going to the Report itself as shown above in SCREENSHOT #8B.
- Items in the "Shopping Cart" WILL remain there until either: (1) the purchaser completes checkout, or (2) an Admin removes the item from the Shopping Cart."
- You can also click "Send Reminder" to a purchaser who has let an item in their "Shopping Cart" to give them a deadline to complete the purchase and then remove the item if needed.

- Go to "Forms & Payments."
- Click on "Manage Form."
- Click on "Report."
- You can click on "View Orders by Form/Item" or "View Orders by Time Range."
- You can also "Search By User" and put the person's name in, or if you have the Order Number, just put in the Order Number in "View Order Details by Order. #."
NOTE: If you choose to enter either the person's name or order number, you will see all of the orders that the person has placed on your site in the current School Year.
- Whether you do a search on name or order number or open the form itself through "View by Form/Item", you will just need to find the person's name or order that you want to Refund, and click on the actual "Order Number."
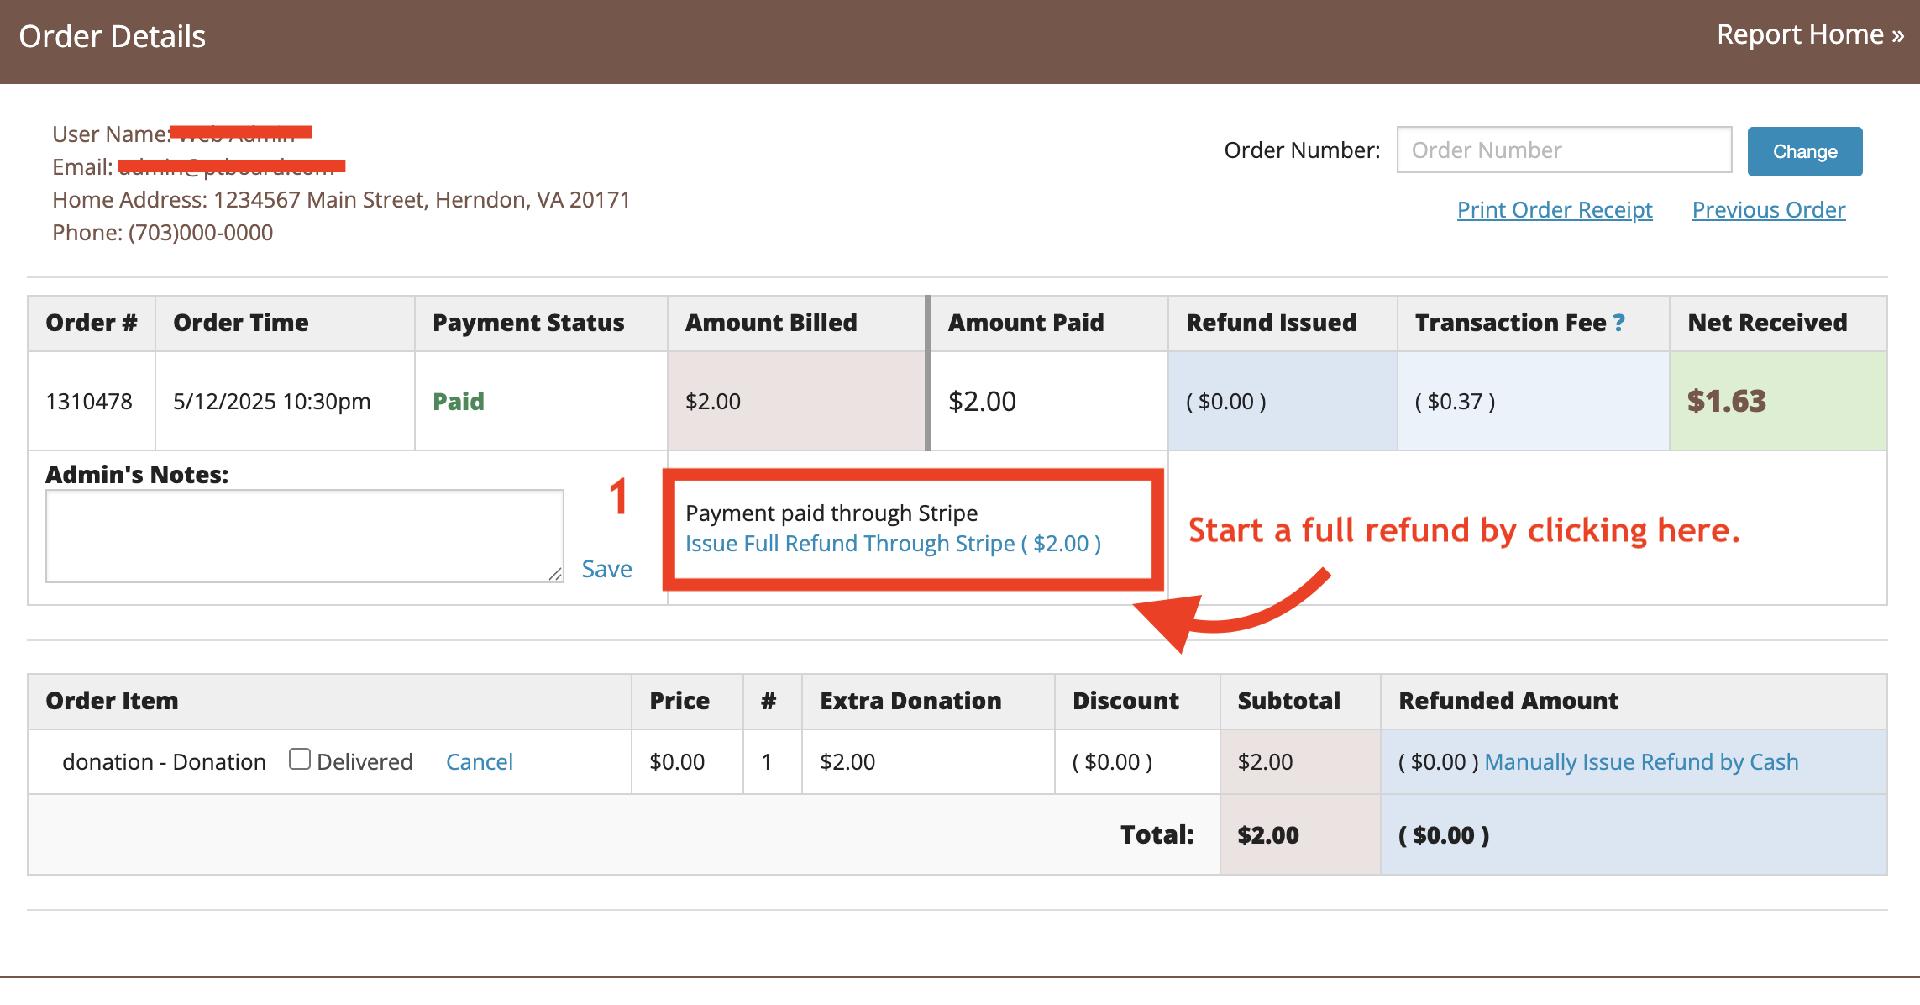
Issuing a Full OR Partial Refund When Purchaser Originally PAID by PayPal or Stripe:
*Note: PayPal and Stripe policy does not allow for a PARTIAL refund, so please see below for instructions on how to do a PARTIAL refund, EVEN if the purchaser paid electronically.
- If you would like to issue a refund through PayPal or Stripe, you would first click on "Issue Full Refund Through Stripe (or PayPal)" on the "Order Details" page.
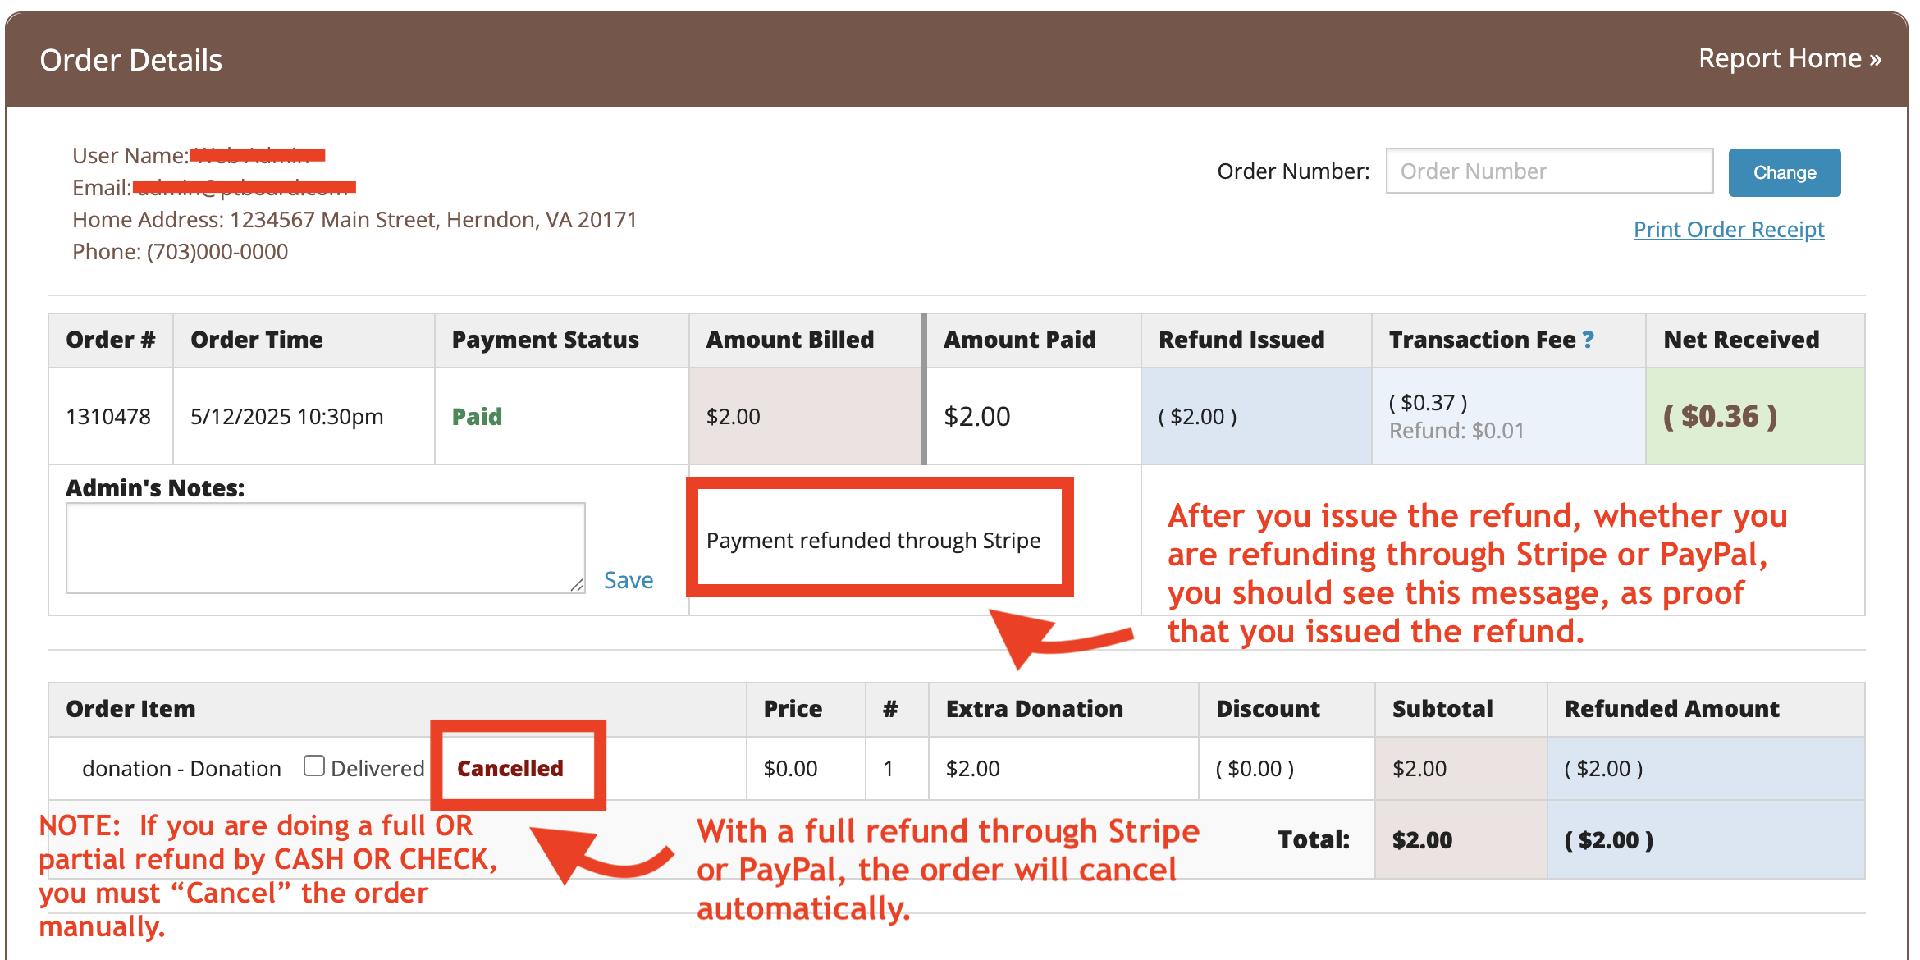
NOTE: Whether you are charging the transaction fees to the Parents or you are just paying the transaction fees yourselves, you will not be able to recoup the transaction fees. If a parent paid by PayPal or Stripe and is requesting a refund, you could technically recoup the transaction fees by pay the the parent back by cash or check for the total amount minus the transaction fees.
- Once you click "Issue Full Refund through Stripe (or PayPal)," you will see the screen below. Click "Issue Refund Now" to complete the refund.
- Put a note in the Admin Notes section to explain what you did for others who may need to look at the information.
- Be sure to click "Save!"
- Here is what you should see:
- Click on "Manually Issue Refund by Cash (or Check)."
- You will see this represented by "1" at the bottom right of the order form:
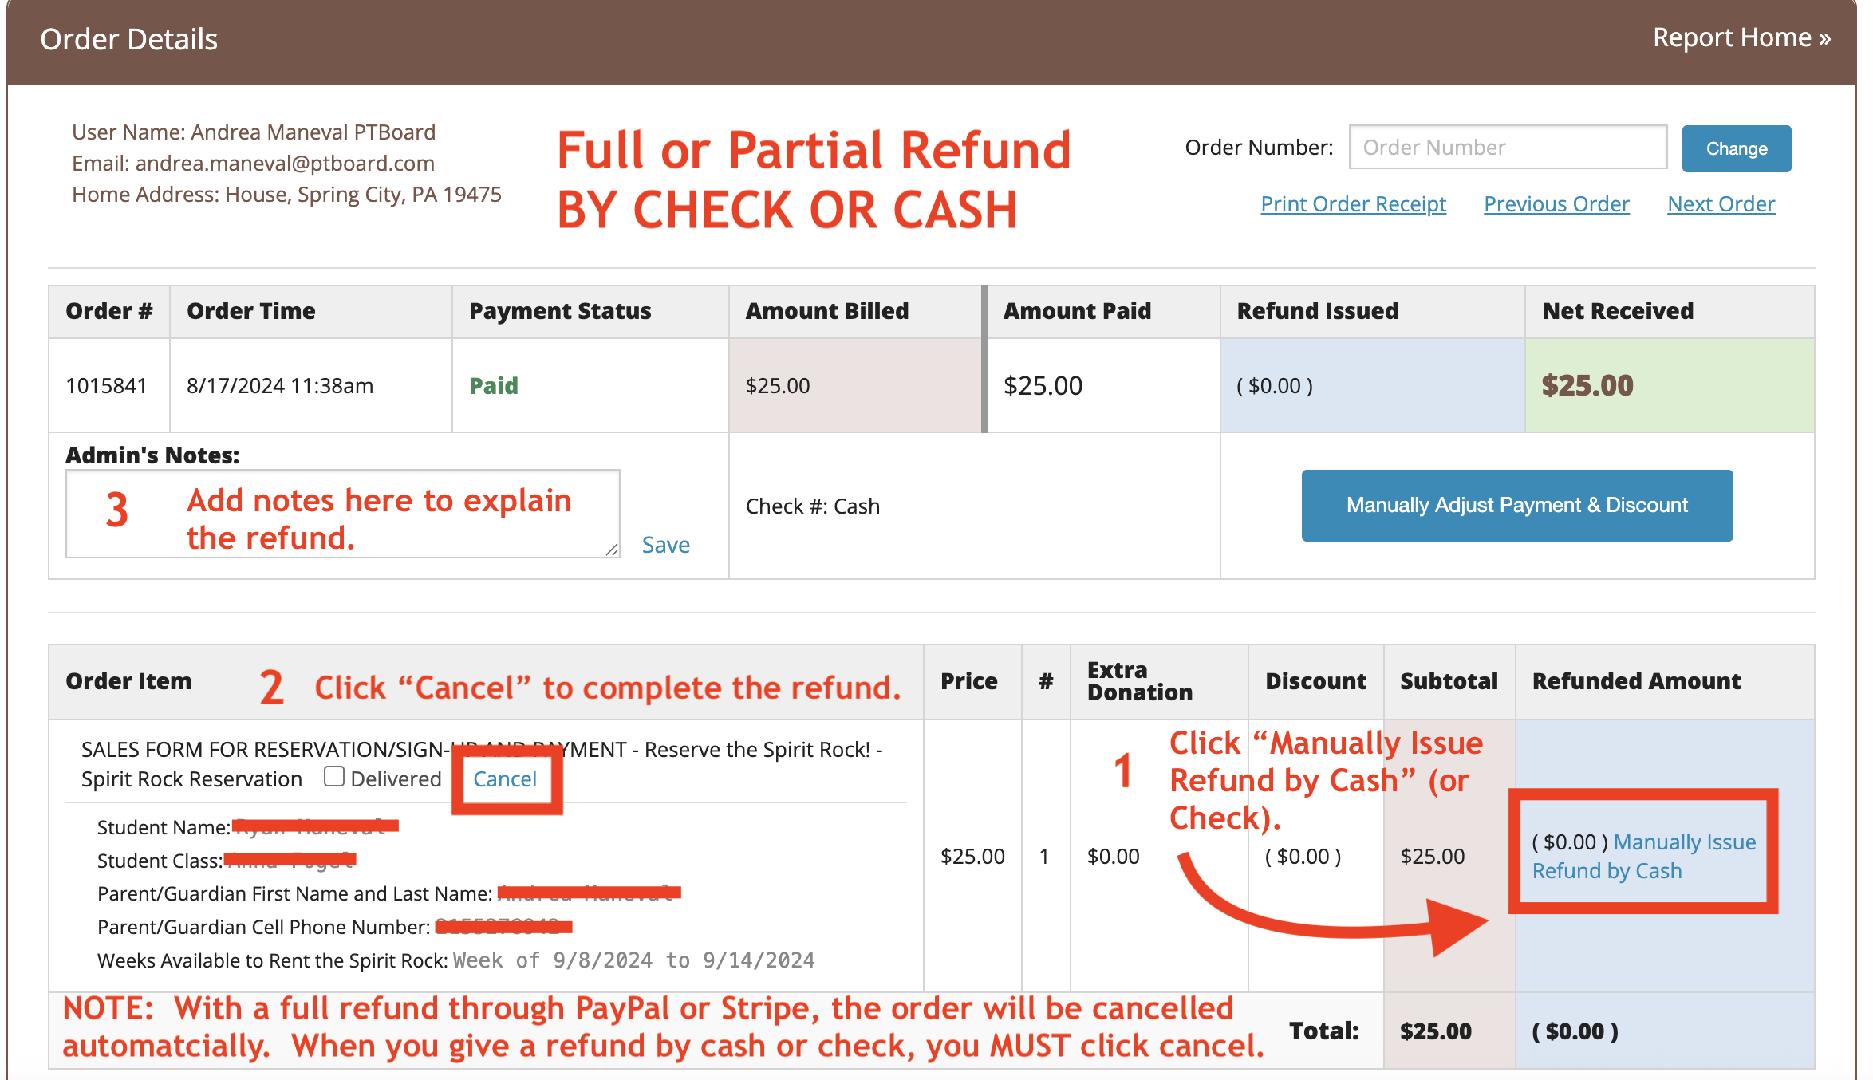
- Put in the total amount you need to Refund and click "Save."
- Then, make sure you also click "Cancel" as shown in "2".
- It's best practice to put notes in the Admin Notes section as shown by "3". Don't forget to click "Save!"
How to Enter Cash & Checks at In-Person Events & Cash/Check Purchases Online
You can enter cash or checks:
-
At In-person events
-
For online purchases placed with the "Place Order by Check or Cash" button
In-person Events or Paper Forms:
You can use the "Place Order for Others" feature to enter orders that have been placed in-person or by paper form.
In order to do that:
(1) Click on "Forms & Payments."
(2) Click "Manage Form."
(3) Click "Place Order for Others."
(4) You will see this screen:

need to provide a First Name, Last Name and Email Address. Or, the Parent/Guardian etc. can
choose to use their Google or Facebook login instead. However, if you want to keep track of all
of your financial transactions and the purchaser does not have an email, you can use a common
school email like your PTA or PTO Email Address. If you choose to do that, be sure to put notes
in the "Admin Notes" section to record who purchased the item.

(7) Click "Add to Cart" and you will be taken to this screen, the "User's Shopping Cart."
(8) Fill in the information, including the payment amount, if the purchaser received a discount and whether you received cash or check. It's a good idea to also add notes in the "Admin Notes" section, so there is additional information on the transaction.
(9) Remember to click "Place Order!"

-
PTBoard How to Enter Cash or Checks from In-Person Events or Online Purchases.pdf
PTBoard How to Enter Cash or Checks at In-Person Events or Cash/Checks Purchases Online

-
PTBoard Can't Find Our PayPal Account.pdf
PTBoard Can't Find Our PayPal Account
PLEASE NOTE: These instructions are for taking electronic payments at in-person events. Please see the article on LearnPTBoard for taking Cash/Check at in-person events: How to Enter Cash or Checks at In-Person Events or Cash/Check Purchases Online.
At this point in time, PayPal and Stripe handheld readers are not integrated with PTBoard. However, there are two ways to have your families pay online at in-person events.
At an in-person event, you can:
Use the form’s unique QR Code to pay.
(1) Create a Form ahead of time for the items or items to be purchased.
(2) Put the Form’s unique QR Code available on your payment table.
(3) Ask the purchaser to scan the QR Code which will allow them to fill out the Form and make payment using a browser
OR
Encourage your families to download the PTBoard App from the App Store or the Google Play Store and check out through the app.
This is what the PTBoard app looks like:

Example of Three Different Scenarios:
At your Spring Carnival, you would like to collect pre-orders for Candy, and you have an ongoing online sale as well. You have your Candy Form set up so that Guests can checkout as well users on your site. A Parent comes up to your table and wants to purchase Peanut Butter Eggs and Chocolate Bunnies. You show the Parent the QR Code that you have put in an acrylic stand with the title, “Purchase Candy Here!,” and ask the Parent to scan the QR Code to make their purchase either on a browser or the PTBoard app.
Another Parent comes up to your table, but forgot their phone at home. You tell them that it’s okay, you can help them because you have a laptop, iPad or your phone available for them to make their purchase!
A grandparent wants to buy candy for their grandchildren, but doesn’t have a phone and doesn’t understand QR Codes. You tell the grandparent that you can enter the information for them, and help them with payment by using your laptop.
TIP: If you are using one of your organization’s devices, always make sure that you have logged out from the last person who made a purchase on the device before the next Parent makes a purchase using your device.
-
PTBoard How to Take Online Payments Through PTBoard at In-Person Events.pdf
PTBoard How to Take Online Payment Through PTBoard at In-Person Events

How to Fix Can't Checkout Error Message
If you came to this page from an email app and were unable to complete payment, this is due to PayPal and Stripe limitations in conjunction with Safari and email servers. You will need to complete payment in Safari. To do that, please follow the new instructions below.
NOTE: If you use Chrome as your default browser, you will not have this issue.


Please note that #3b is the better option since you won’t have to change your settings every time you try and make a purchase through a link in your email.
Please reach out to Andrea at andrea.maneval@ptboard.com if you have any questions.
-
*PTBoard How to Fix Can't Checkout Error Message.pdf
PTBoard How to Fix Can't Checkout Error Message
Creating a Membership Form
The "Membership Form" is great if you have membership dues, but it also makes your job a lot easier, and requires less steps for parents/guardians too even if you DON'T have membership dues.
** If you are a PTA or PTSA and would like to use the "View & Pay State PTA" feature in combination with your "Membership Form," please see the article, How to Setup and Use the "View & Pay State PTA" Feature, after creating your "Membership Form."
To set up your "Membership Form," go to "Forms & Payments," then "Manage Form" and "Create a New Form" to choose the "Membership Form."
Choose the information you want to include, and add any "Custom Fields" that you would like before you publish your form.
NOTE: When you click "Membership Form," you will see the screen below to start setting up your form. You do not have to use each of the categories listed. Please just add an amount in the categories you want to use, and leave the other categories blank.

Once you click "Create Membership Form," you will then be taken to this screen showing the view that your members will see on your site.
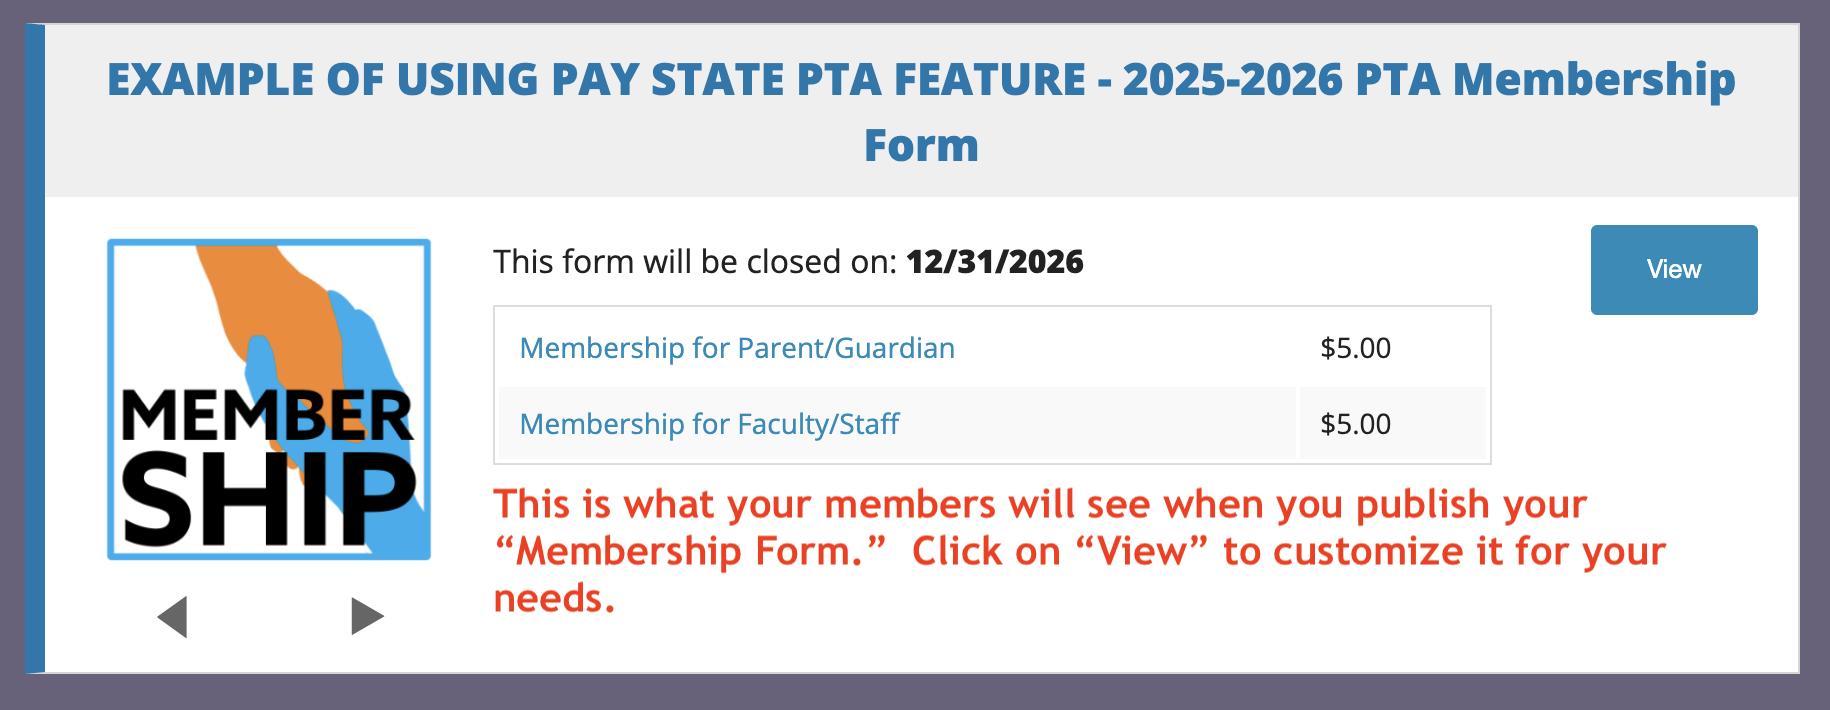
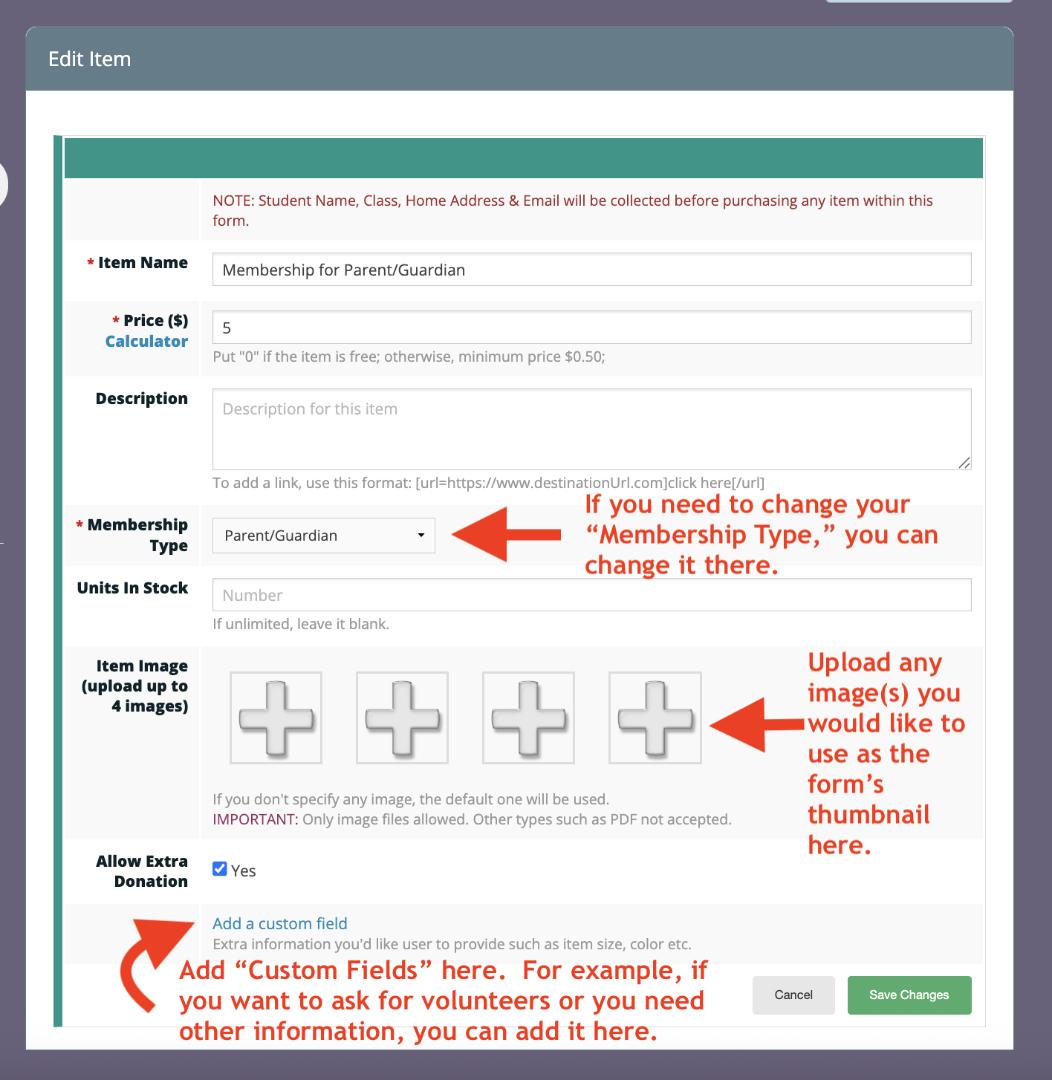
Click "View" to customize the main form and individual "Membership Types."

In order to add or change any information on the main form, you can click "Manage this Form," and then "Edit Form" which is shown below:

To make changes and customize each "Membership Type," click "Manage this Item," then "Edit this Item."
How to Setup and Use the "View & Pay State PTA" Feature
PTBoard has a feature called "View & Pay State PTA" which is available for any PTA or PTSA to use to collect Membership information, accurately record state PTA dues and download a CSV which an Admin can then upload on the site your state PTA requires.
Why Use the "View & Pay State PTA" feature?
*Your member's information in one place: Collect information that you need for your members, including additional information like, "will you volunteer" or "t-shirt size for student" etc.
*Manage your own dues: Keep the money you want to collect for your dues, and only pay your state PTA what they require. Your money will go directly to your PayPal or Stripe account, and then into your bank account. PTBoard's reporting feature will make sure you are up-to-date on your finances.
*LESS STEPS! Be able to send out all of your communications with your member list, set up your "Student Directory" AND your "Class & Group" AUTOMATICALLY with LESS steps for you and your members! For example, add your teachers, classes or grade levels in "Manage Class" ahead of time, when someone fills out and submits a "Membership Form," the site will automatically add the parent/guardian's email and student associated with that parent to the correct class. And if you are using the "Student Directory," the parent/guardian will need to opt-in or opt-out of the directory as part of filling out the form.
*Easy to download a CSV to upload elsewhere: PTBoard's "View & Pay State PTA" produces a report that is customized to your state PTA. You can then use that CSV (or convert to Excel) to upload.
*PLEASE NOTE: Although PTBoard doesn't integrate with other third party provider (unless the third party is a payment processor like PayPal or Stripe), there are a lot of benefits to using the "Membership Form." All of the information you need to provide your state PTA is provided and already calculated for you. You just need to download that information. Whether you pay your state PTA online or you send a check, you can easily upload your member information from your PTBoard CSV, and then pay like you normally would.
How to Setup the "View & State PTA" feature:
Step #1: Contact Andrea at andrea.maneval@ptboard.com and ask to have your "View & Pay State PTA" feature set up. Please include your state name and the amount of the dues that your state requires for EACH member in the email. For example, you may collect $10.00 for each member, but your state requires you pay $3.75 for EACH member. The $3.75 is the number PTBoard will need to set the feature up.
Step #2: Create your "Membership Form." Go to "Forms & Payments," then "Manage Form" and "Create a New Form" to choose the "Membership Form."
** If you would like more information on how to set up a Membership Form, please see this article, Creating a Membership Form.
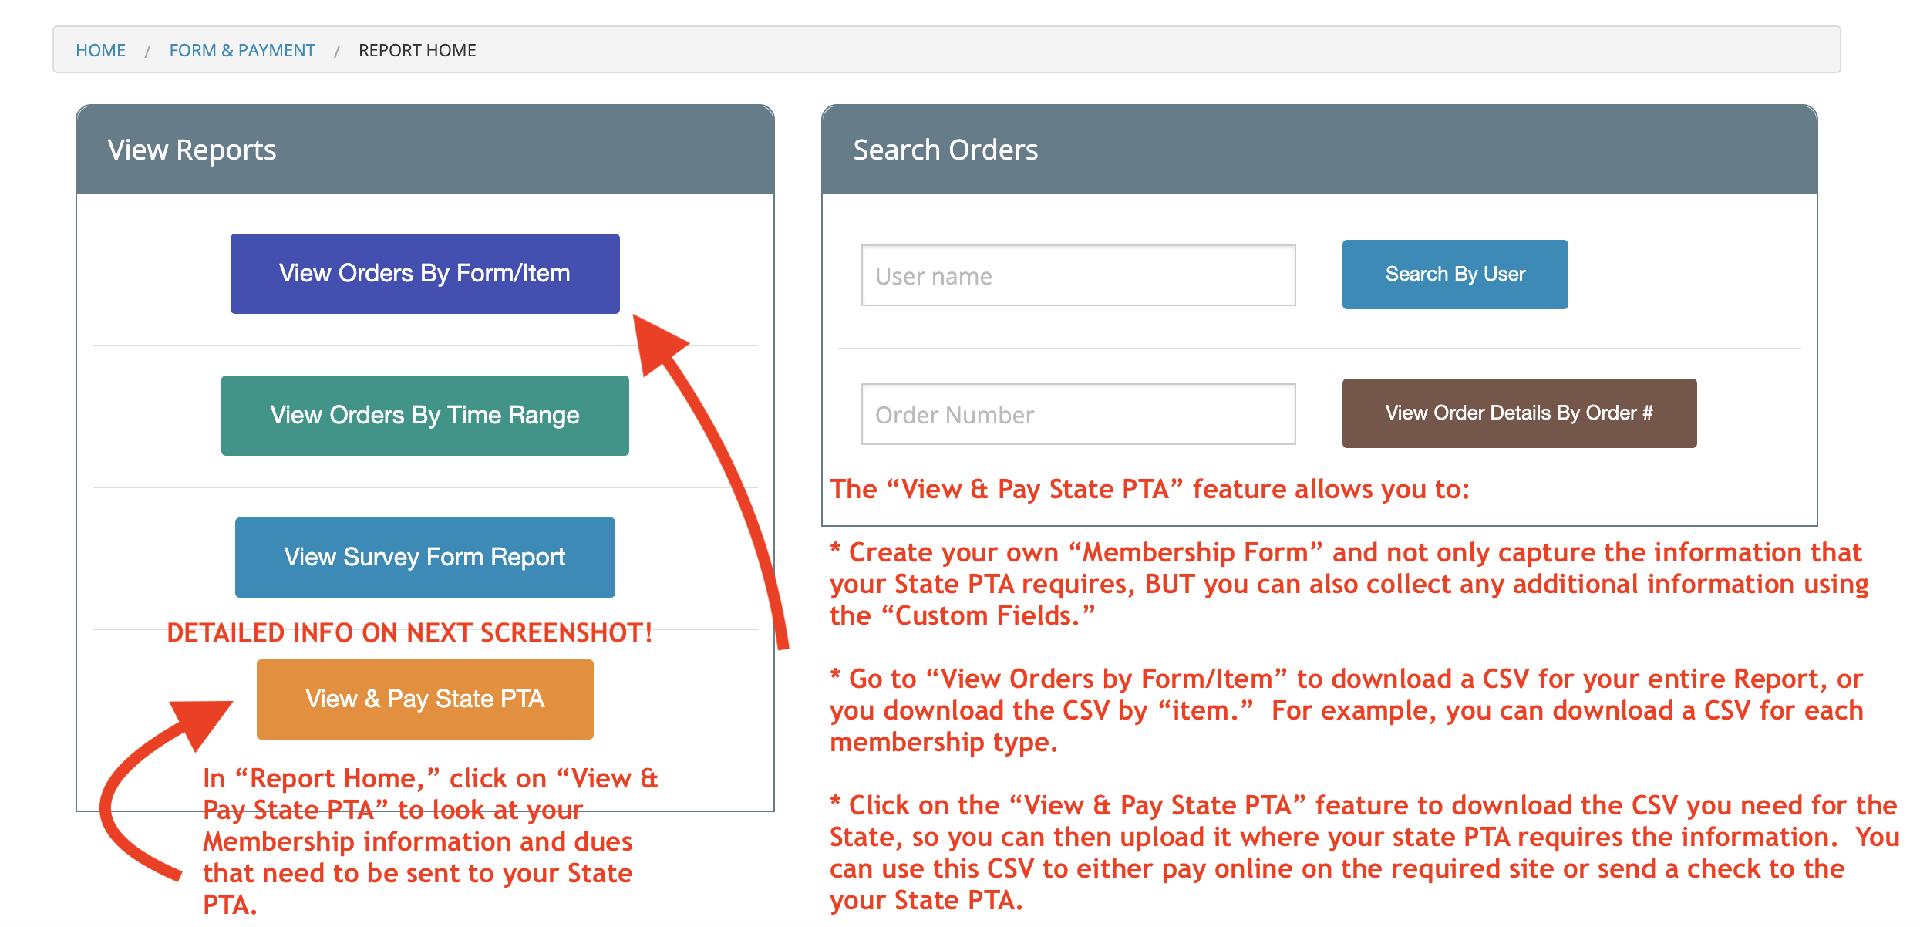
Step #3: How to View the Report for Your "Membership Form." Click on "Forms & Payments," then "Manage Form." Click "Report" to go to the "Report Home" as shown below.
"View Orders by Form/Item" Report
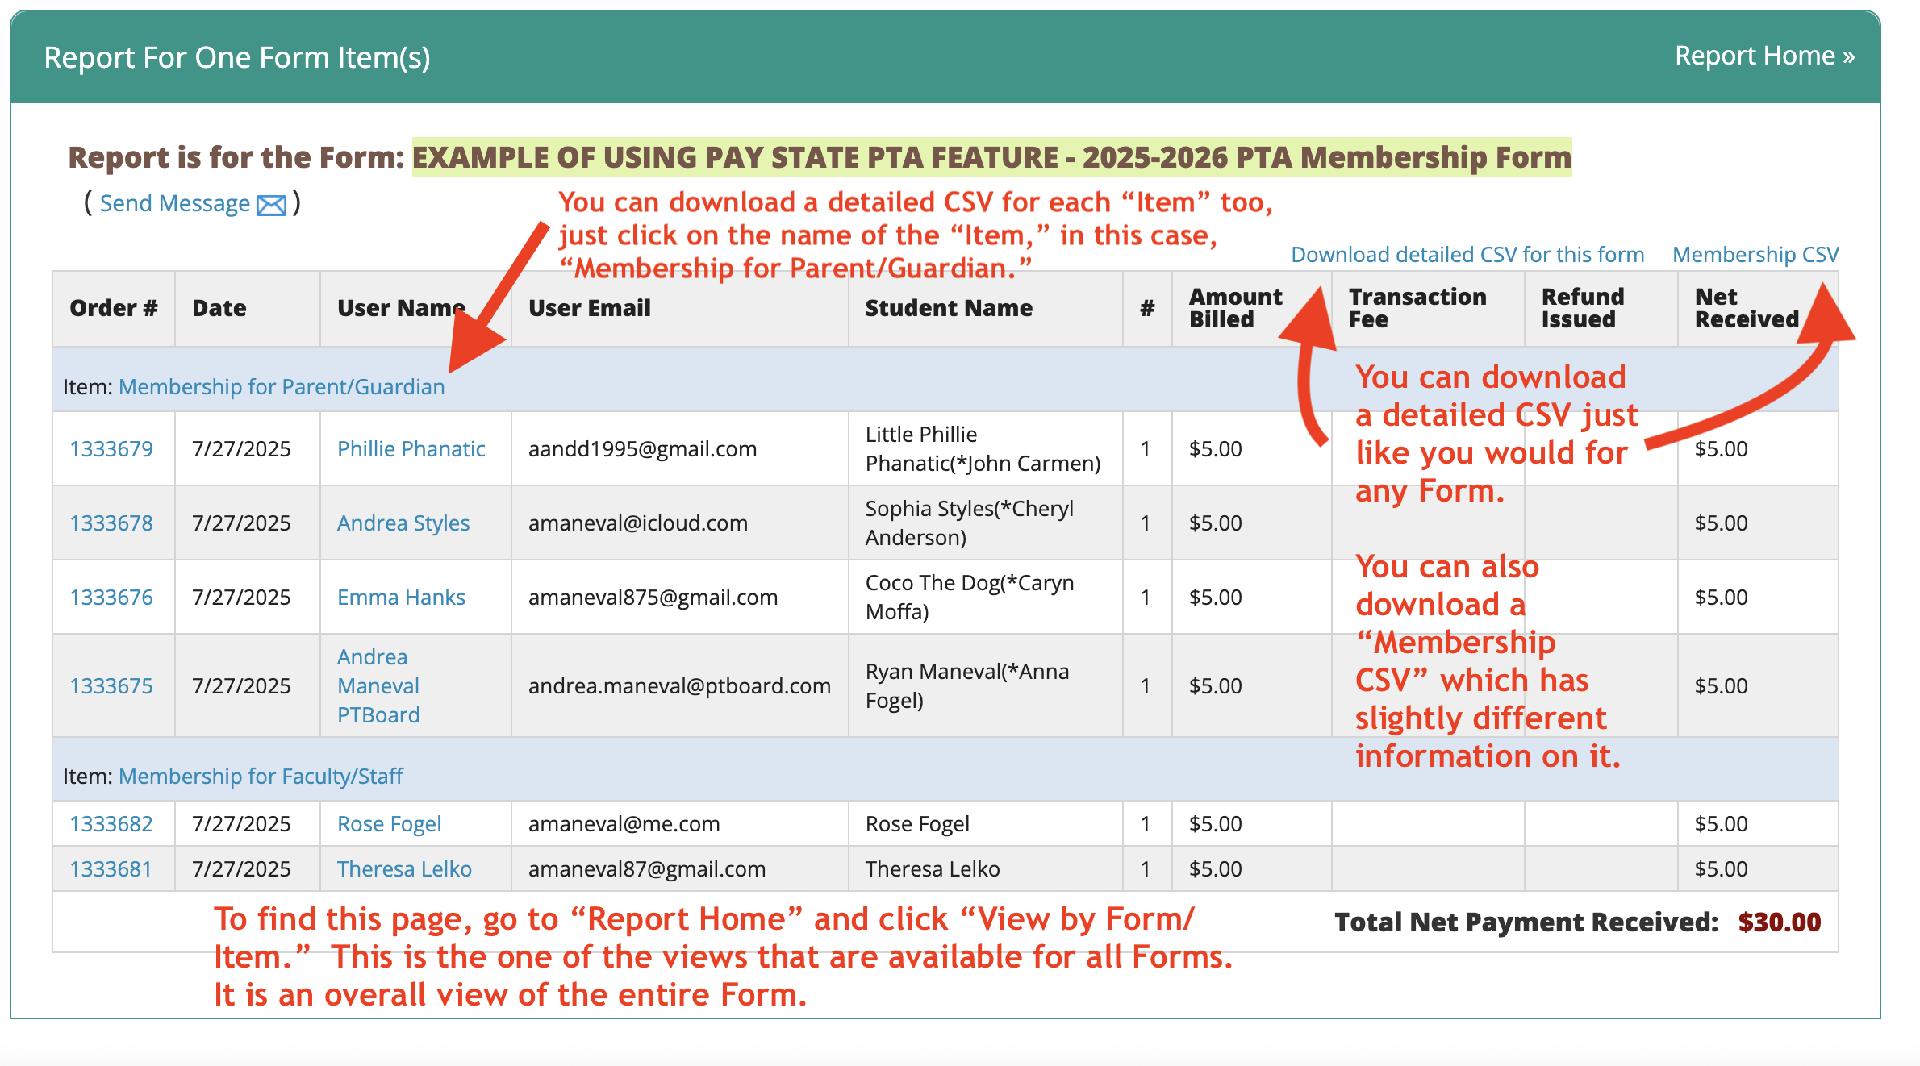
For all Forms, you can see a "Report" as shown below. This is an example of a "Report" for a "Membership Form."
"View & Pay State PTA" Report
This is what the main "Report" for "View & Pay State PTA" looks like.
IMPORTANT REMINDERS:
- Please contact Andrea to make sure your "View & Pay State PTA" feature is set up correctly for your state.
- In order to submit your membership to your state PTA, you will need to download the CSV that is provided within the feature.
- Then, you can pay your state PTA either by check or through their online portal.
Please contact Andrea at andrea.maneval@ptboard.com if you have any questions!