- Getting Started with PTBoard
- What Are Roles & Who Has Access to Our Site?
- How to Fix Time Zone Issue with Imported Google Calendar
- Benefits of Creating a Membership Form
- PTBoard's Referral Program
- New PTBoard Subscribers Back to School Tasks!
- Existing PTBoard Subscribers Back to School Tasks!
- Flyer to Give or Send Out to Parents and Families
- Flyer to Give or Send Out to Teachers and Staff

Getting Started with PTBoard
Here are some helpful tips and tasks to review and complete to get the most out of your new site!
Take a look at this list for more tips and tricks including instructional content and videos:
- Take a quick video tour of a PTBoard site.
- New Admin first steps are here.
- Go to LearnPTBoard to get helpful information for Admins including step-by-step instructions and tutorial videos.
- Click on "FAQs for Admins" at the top right of your site when logged in as a Super Admin.
- View some tutorial videos here, or take a look at the videos available with each feature.
- Review the information in the article: New PTBoard Subscribers Back-to-School Tasks
- Review the attached "Introduction to PTBoard PowerPoint Presentation."
- Questions? Email our Training Manager, Andrea Maneval, at andrea.maneval@ptboard.com or schedule a one-on-one with Andrea here.
-
PTBoard Introduction Presentation.pptx.pdf
PTBoard Introduction Presentation

What Are "Roles" & Who Has Access to Our Site ?
Description of Roles
Here is a description of each role and how you can use some of the roles to help manage your site:
Role with FULL Site Management Capabilities:
- Super Admin
- If you are a Super Admin, you can manage and maintain your entire site.
- Super Admins can manage and invite users, change user roles and do a school rollover each year.
- Operation Admin
- If you have a volunteer who will be managing a few features including all of your Volunteer Signups and the Calendar. So, you can give her the Operation Admin role. When you change her role to Operation Admin in the "School Parent List" within "Manage User," a "Permissions" box will pop up. You can choose the access level that you would like her to have.space space space space
- Room Parent or Teacher Role
- Within each Class in "Manage Class," you can give users the "role" of "Room Parent" or "Teacher."
- When you give a user the "Room Parent" or "Teacher" role, they will be able to manage the communications for that classroom by creating Announcement or sending out Volunteer Signups for classroom parties or other class events.
Roles with NO Site Management Capabilities:
- Parent/Guardian
- Family
- Grandparent
- Student
- Faculty/Staff
- Other (you can categorize how best fits your needs)
*Reminder: You can change any of these categories on the "Membership Form."
Roles Related to the Membership Form and Your School Parent List
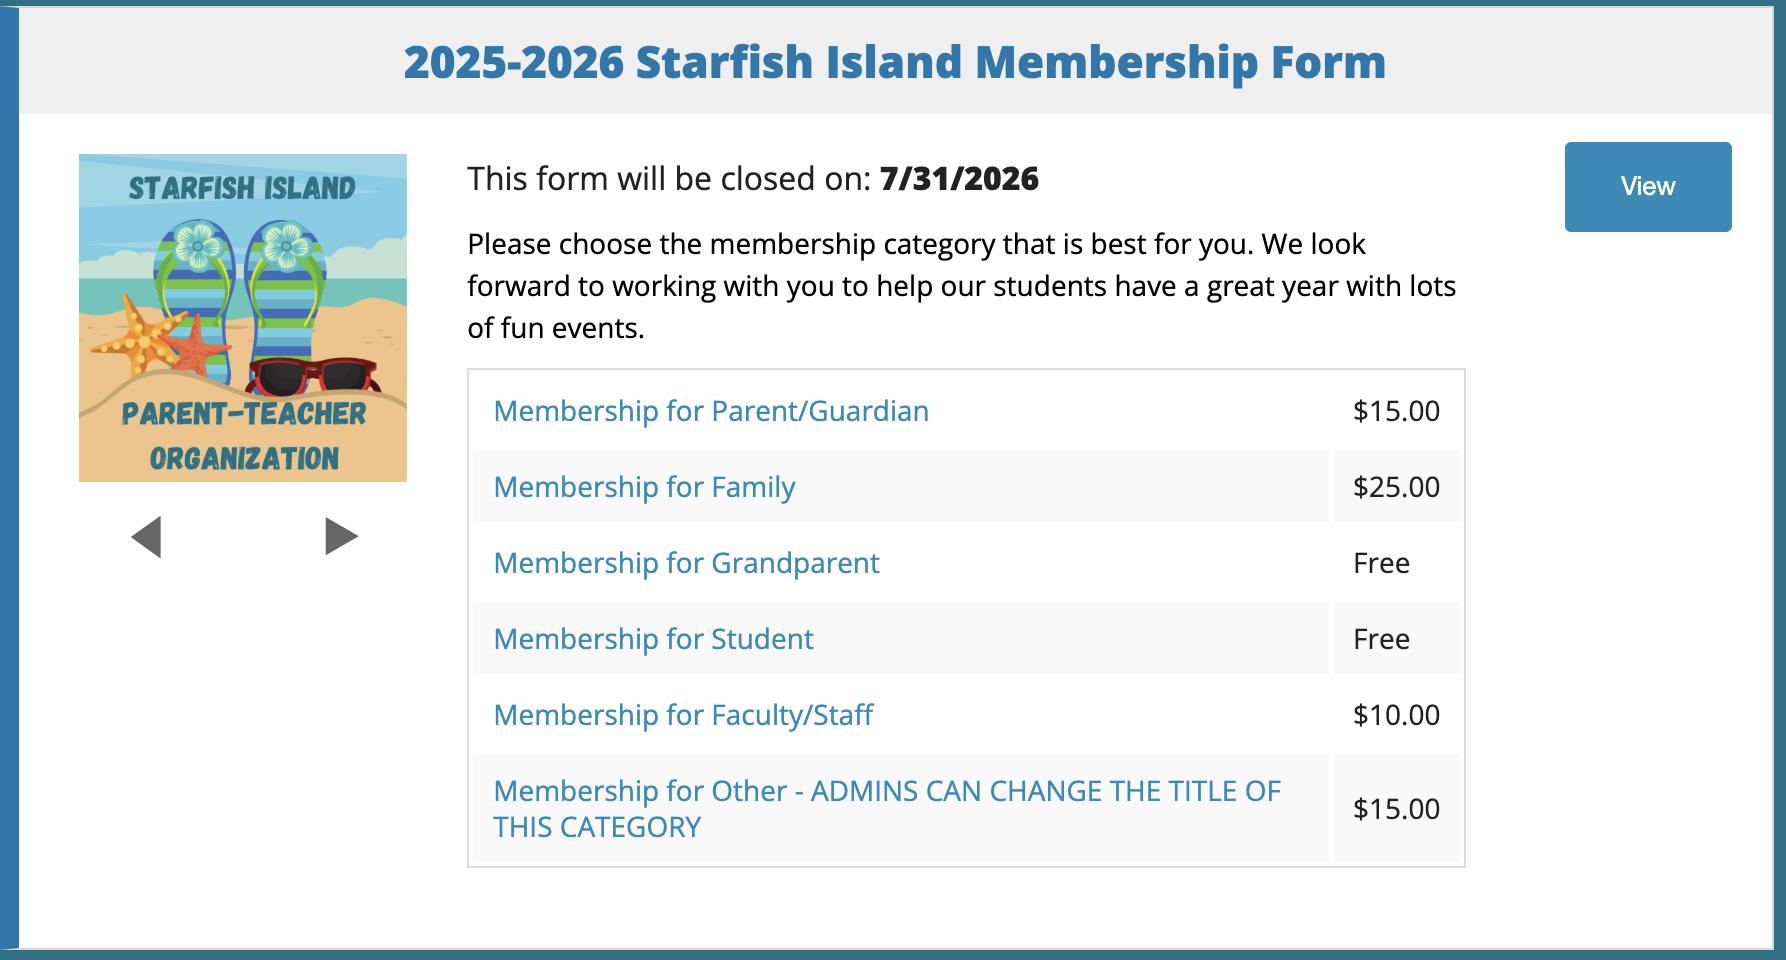
- When you set up a "Membership Form," you have several choices for different types of membership. When you look at your "School Parent List" aka your "User List" within "Manage User," each person has a role. When you look at your "Class & Group" by setting up "Manage Class," there are "roles" to choose for the users, which means the parents/guardians in that class or grade level.
- When a school community or organization member fills out a "Membership Form" and chooses a membership category that you have set up, they will automatically have the "role" of the "Membership Type" they filled out.
- In the screenshot below, you can see all of the possible membership "types," HOWEVER, you can customize any of the membership types by editing the form. For example, if you want to the "Membership for Parent/Guardian" to be "Starfish Island Parent/Guardian Membership" you can do that.
****You do not need to add every membership type that is available when creating your "Membership Form." You can always add or delete categories that you need or don't need.****
NOTE: The "Parent/Guardian Membership" type only REQUIRES ONE Parent/Guardian, but ALLOWS for TWO Parents/Guardians to add their information on the "Membership Form." The "Family Membership" type REQUIRES TWO Parents/Guardians, and ALLOWS for TWO Parents/Guardians to add their information.
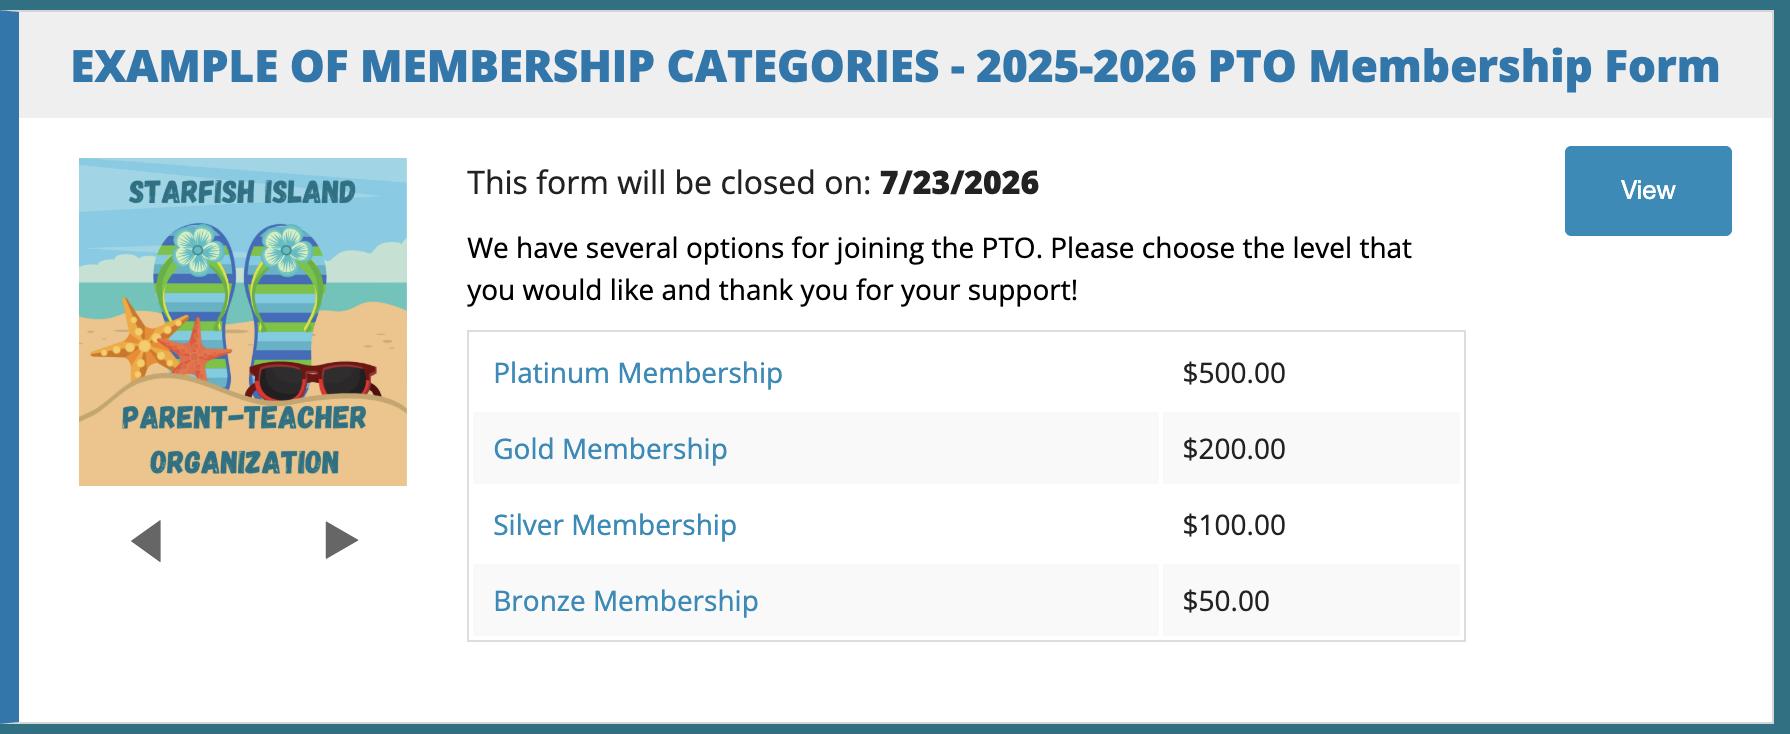
You can also use the "Membership Form" to create "tier level" memberships as seen below.

How to Fix Time Zone Issue with Imported Google Calendar
In most cases, the reason an imported Google Calendar isn't syncing correctly with your PTBoard Calendar is because the time zone setting is different from your school’s time zone.
For example, if your school is in the US/Eastern time zone, you’ll need to update your Google Calendar to US/Eastern as well.
To do this:
(1) Open the Google Calendar you would like to import to your PTBoard calendar. On the left side, hover over the calendar you want to import, and click the three-dot menu that appears.
(4) Change the Time Zone to match your school’s time zone.
Benefits of Creating the Membership Form Even if You Don't Have Dues!
Even if you don't have dues for your organization, having a Membership Form on your site has a lot of benefits!
- It gives you the ability to capture information from your Parent/Guardians, Families, Faculty/Staff and other supporters of your organization.
- You can also create any categories you want, if Membership for Parent/Guardian or Membership for Faculty/Staff doesn't work for your organization. For example, you can create "sponsorship" categories like: Bronze Level or 1st Tier.
-
It requires Parents/Guardians to opt-in or opt-out of the Student Directory.
-
If you are using the Student Directory and Class & Group features, the Membership Form will automatically set up those features for you.
-
It is a great way to introduce your Families and Faculty/Staff to PTBoard!

Referral Program
What Does the School I Refer Need to Do to Make Sure We Both Receive the Referral Credit?
When the school your refer sign up for a PTBoard site by going to ptboard.com, make sure they put your SCHOOL NAME on the School Setup page so that you both receive the referral credit!
The following criteria must be met by the school you refer in order for your organization to receive a referral credit:
Use at least 2 features on PTBoard, and have at least 25 users on their "School Parent List" in Manage User. Once this is confirmed, YOUR ORGANIZATION will receive a referral credit! Note: If you have questions, please let Andrea know at andrea.maneval@ptboard.com to discuss your individual circumstances.
How Do I Make Sure I Receive 1-Year Free If Another School Referred My Organization?
When you set up your organization on PTBoard, did you add your REFERRAL SCHOOL'S NAME? If so, you are set! You can always go to “Manage School,” and look in the “PTBoard Subscriptions” box to check as well. Note that there is always a red “Pay” button in that box as well. That doesn’t mean that you owe your annual fee, but it’s just available there in case you need it. Questions? Reach out to Andrea at andrea.maneval@ptboard.com.
When Will My Organization Receive Credit for Referral(s)?
In June or July, when organizations are invoiced, all schools will be reviewed to check for referrals. The above criteria must be met by the school you referred for your organization to receive a referral credit.
What If the Organization I Referred Isn't Using Their Site by Invoice Time?
Reach out to them! See if they need some assistance. Give them my email: andrea.maneval@ptboard.com, so they can reach out to me!
How Many Schools or Organizations Can I Refer?
You can refer as many schools as you would like! There is no limit to the number of schools you can refer.
-
PTBoard Referral Program.pdf
PTBoard's Referral Program

Welcome to Our Newest PTBoard Subscribers!
Back to School Tasks
If this is your first year with PTBoard, follow the tasks step-by-step, and we'll guide you through your new site set-up.
Task #1:
If you are a new PTBoard subscriber who signed up after January 2025, your site will be in the 2025-2026 School Year already, unless you asked to have it rolled back to the 2024-2025 School Year so you could get started using your site right away.
So, just to make sure you don't need to Rollover, please go to "Manage School," and in the first box, "PTBoard Subscriptions" you should see:
School Year: 2025~2026
If you still see School Year: 2024-2025, please "Rollover" your site before you start adding content for the 2025-2026 School Year. Detailed instructions to Rollover are HERE.
Task #2:
Go to "Manage School" on the left side menu to add your school’s logo, banner and change the background color.
Task #3:
Go to "Manage Class" on the left side menu to "Create Classes or Groups." For example, elementary schools usually add Teachers' names. Middle Schools and High Schools usually create Grade Levels such as 7th Grade or Class of 2028.
Task #4:
Go to "Manage School" and scroll down to "Online Store & Payment Receiving Accounts" to set up a school payment receiving account.
IMPORTANT: Parents do not need to have a PayPal or Stripe account in order to make payments on your site. ONLY your organization needs to have one or both of those payment methods to process payments.
Task #5:
Create a "Membership Form." To do that, go to "Forms & Payments," "Manage Form" and then "Create a New Form."
Note: Remember, even when your organization doesn't have dues to "join," the Membership Form sets up your Student Directory and your Class & Group section automatically. See the Benefits of Creating a Membership Form here!
Task #6:
Invite users including Parents/Guardians, Faculty/Staff etc. to your "School Parent List." Go to "Manage User." Click "+ Ways for New Users to Join Your School."
Also, make sure to watch the User Invitation Tutorial Video.
Choose the way(s) you will invite users to create an account on your site:
(1) First Way to Join Your School:
Send invites - Send an invitation email by clicking "Invite Users by Email Addresses."
(2) Second Way to Join Your School:
School Code - Give Parents/Guardians or other school members your red six digit School Code. When someone goes directly to your PTBoard site for the first time, they will be able to enter your "School Code" on the "Join School" pop-up screen to create an account on your site.
Note: Do not put "www" in front of your PTBoard URL - for example, the correct URL looks like this: "example.ptboard.com".
(3) Third Way to Join Your School:
Upload users from an Excel spreadsheet - If you have school members’ contact information stored in a spreadsheet, we can help you batch load these users. Contact us for detailed information about batch loading. You can go directly to "Upload Users from Excel" as well to use the "upload wizard" and download one of the spreadsheet templates.
Task #7:
Set up your organization's Calendar - You can also import your School or District Calendar(s) to your PTBoard if you would like to do that, and export your PTBoard Calendar to your personal calendar.
Task #8:
Preferences - Go to the left side menu and choose "Preferences" such as features you will use and order of features for your site.
Task #9:
Create Custom Pages - When you are on your Homepage, scroll to the bottom left side of the menu and you will see "Add Menu." Create the title of your "Custom Page" and then click on that title to be able to add "tabs" under "Add Page."
Questions? Please contact Andrea at andrea.maneval@ptboard.com or set up a Google Meet or phone call with Andrea HERE.
Existing PTBoard Subscribers: Have you Rolled Over?
Make sure to check out these End of the School Year AND Back-to-School tasks to close out the current school year and get ready for the new one to start!
Task #1:
Make sure you don't need to Rollover. Go to "Manage School," and in the first box, "PTBoard Subscriptions" you should see:
School Year: 2025~2026
If you still see School Year: 2024-2025, please "Rollover" your site before you start adding content for the 2025-2026 School Year.
Task #2:
If you need to "Rollover," please check out the Rollover instructions!
Task #3:
Checklist for After Rollover:
(1) Access and Permissions:
Review the Super Admins and Operation Admins on your site to make sure your current Executive Board has access to the site.
Go to "Manage User."
Then, sort your "School Parent List" so you can see who are currently Super and Operation Admins for your site.
Change Super Admin and Operation Admin Roles to Parents if they no longer hold Executive Board positions or are no longer going to manage your site.
(2) Student Directory:
The "Student Directory" will be empty when you "Rollover" your site. Some of the reasons for that is because students change grade levels, teachers and parents/guardians need to opt into the "Student Directory" each school year.
If you are not using the "Membership Form" to automatically add any users who join your organization and PTBoard, or you send users to the Student Directory each year to join separate from your user list aka "School Parent List" within "Manage User," then you can do the following:
If you would like to create a new "Student Directory," click "Switch School "on the top right of your site to switch back to the 2024-2025 School Year. Before you download your 2024-2025 Student Directory into the new school year, remove the students who have "graduated" from or left your school. Then switch back to the 2025-2026 School Year and upload the updated spreadsheet to the 2025-2026 "Student Directory."
(3) School Logo and Banners:
Go to "Manage School" and scroll down to review your logo, add or change Banners, add a URL to your Banner if you would like and review the background color of your site.
(4) Create or Update Classes and/or Groups:
Go to "Manage Class" on the left side menu to "Create Classes" or "Create Groups." For example, elementary schools usually add teacher's names. Middle School sand High Schools usually create Grade Levels such as 7th Grade or Class of 2024.
Note: Any "Classes" you have set up with teachers or grade levels etc. will REMAIN in "Manage Class." However, "Class & Group" will be empty when you "Rollover" your site. Some of the reasons for that is because students change grade levels and teachers. Keep in mind that using the "Membership Form" will automatically set your "Class & Group" up as well as your "Student Directory," and you can use it whether you have dues or free memberships.
(5) Payment Receiving Account:
Go to Manage School and review your payment receiving account(s) as well as whether or not you want to have purchasers on your site pay transaction fees by scrolling down to "Online Store & Payment Receiving Account(s)."
(6) Invite Users:
Invite users including Parents/Guardians, Faculty/Staff etc. to your School Parent List. Go to "Manage User." Click +Ways for new users to join your school. Make sure to watch the User Invitation Tutorial Video.
Choose the way(s) you will invite users to create an account on your site:
First Way to Join Your School:
Invite Users - Send an invitation email by clicking "Invite Users by Email Addresses," write a quick note and then choose "Send Invitation." Note: If a user is already in the PTBoard system, they will not receive an email. PTBoard's system will not send out multiple emails to "join" because once you have an account on any PTBoard site, it remembers your email. In that case, if you have someone who is already in the PTBoard system, you can just "Invite Users Without Sending Emails."
Second Way to Join Your School:
School Code - Give Parents/Guardians or other school members your red six digit "School Code." When someone goes directly to your PTBoard site for the first time, they will be able to enter your "School Code" on the "Join School" pop-up screen to create an account on your site. Note: Do not put "www" in front of your PTBoard URL - for example, the correct URL looks like this: "example.ptboard.com."
Third Way to Join Your School:
Upload users from an Excel spreadsheet - If you have school members’ contact information stored in a spreadsheet, we can help you batch load these users. Contact us for detailed information about batch loading. You can go directly to "Upload Users from Excel" as well to use the "upload wizard" and download one of the spreadsheet templates.
Task #4:
Calendar - Set up your organization's "Calendar." You can also link School or District Calendar if you would like.
Task #5:
Preferences - Go to the left side menu and choose "Preferences" for your site.
Task #6:
Create Custom Pages - When you are on your Homepage, scroll to the bottom left side of the menu and you will see "Add Menu." Create the title of your "Custom Page" and then click on that title to be able to add "tabs" under "Add Page."

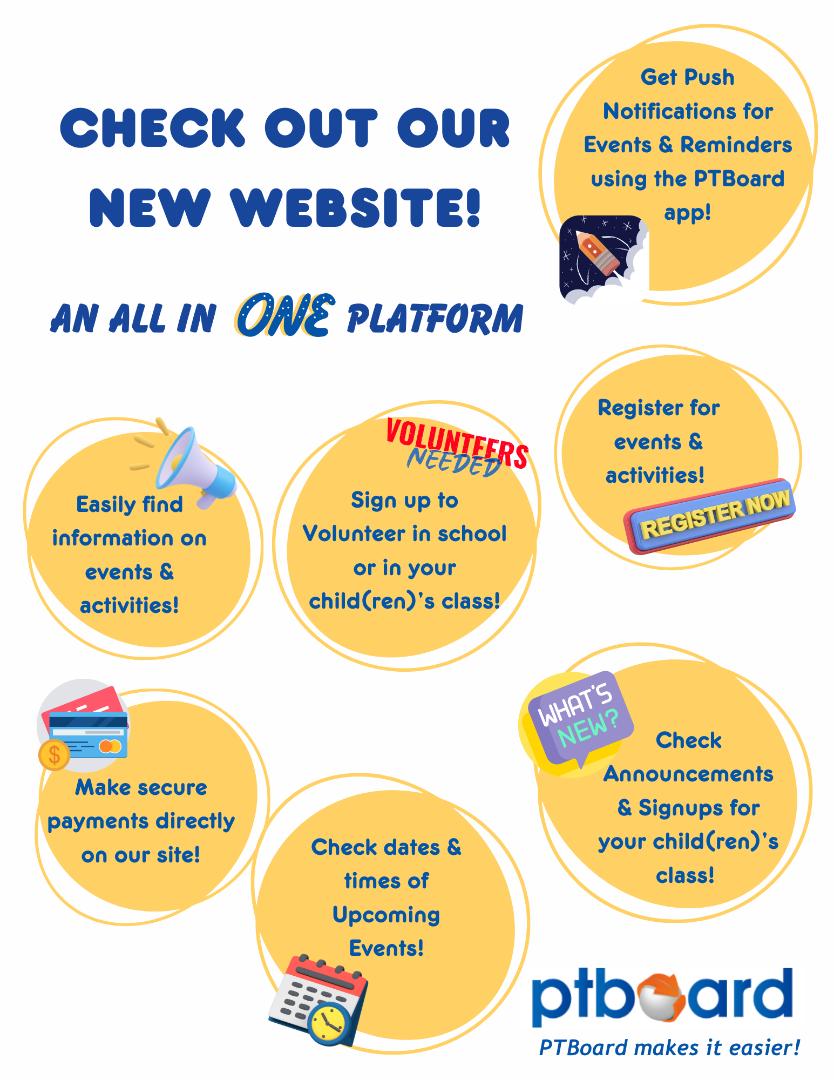
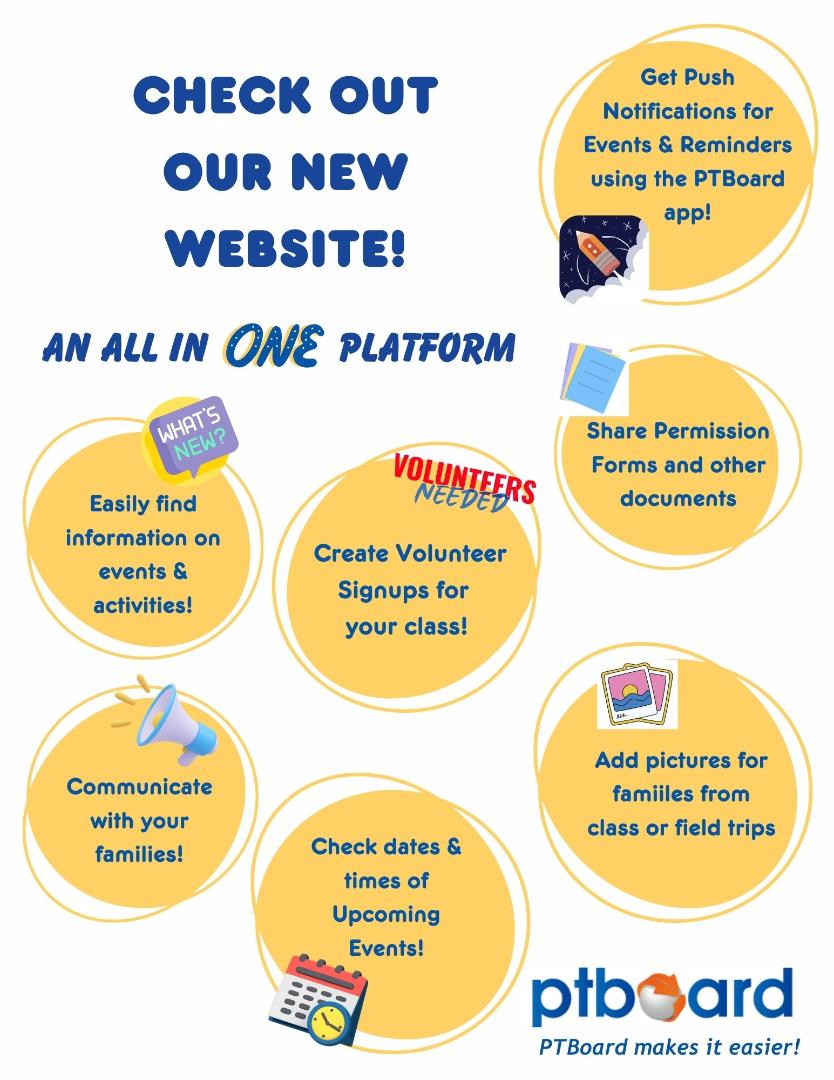
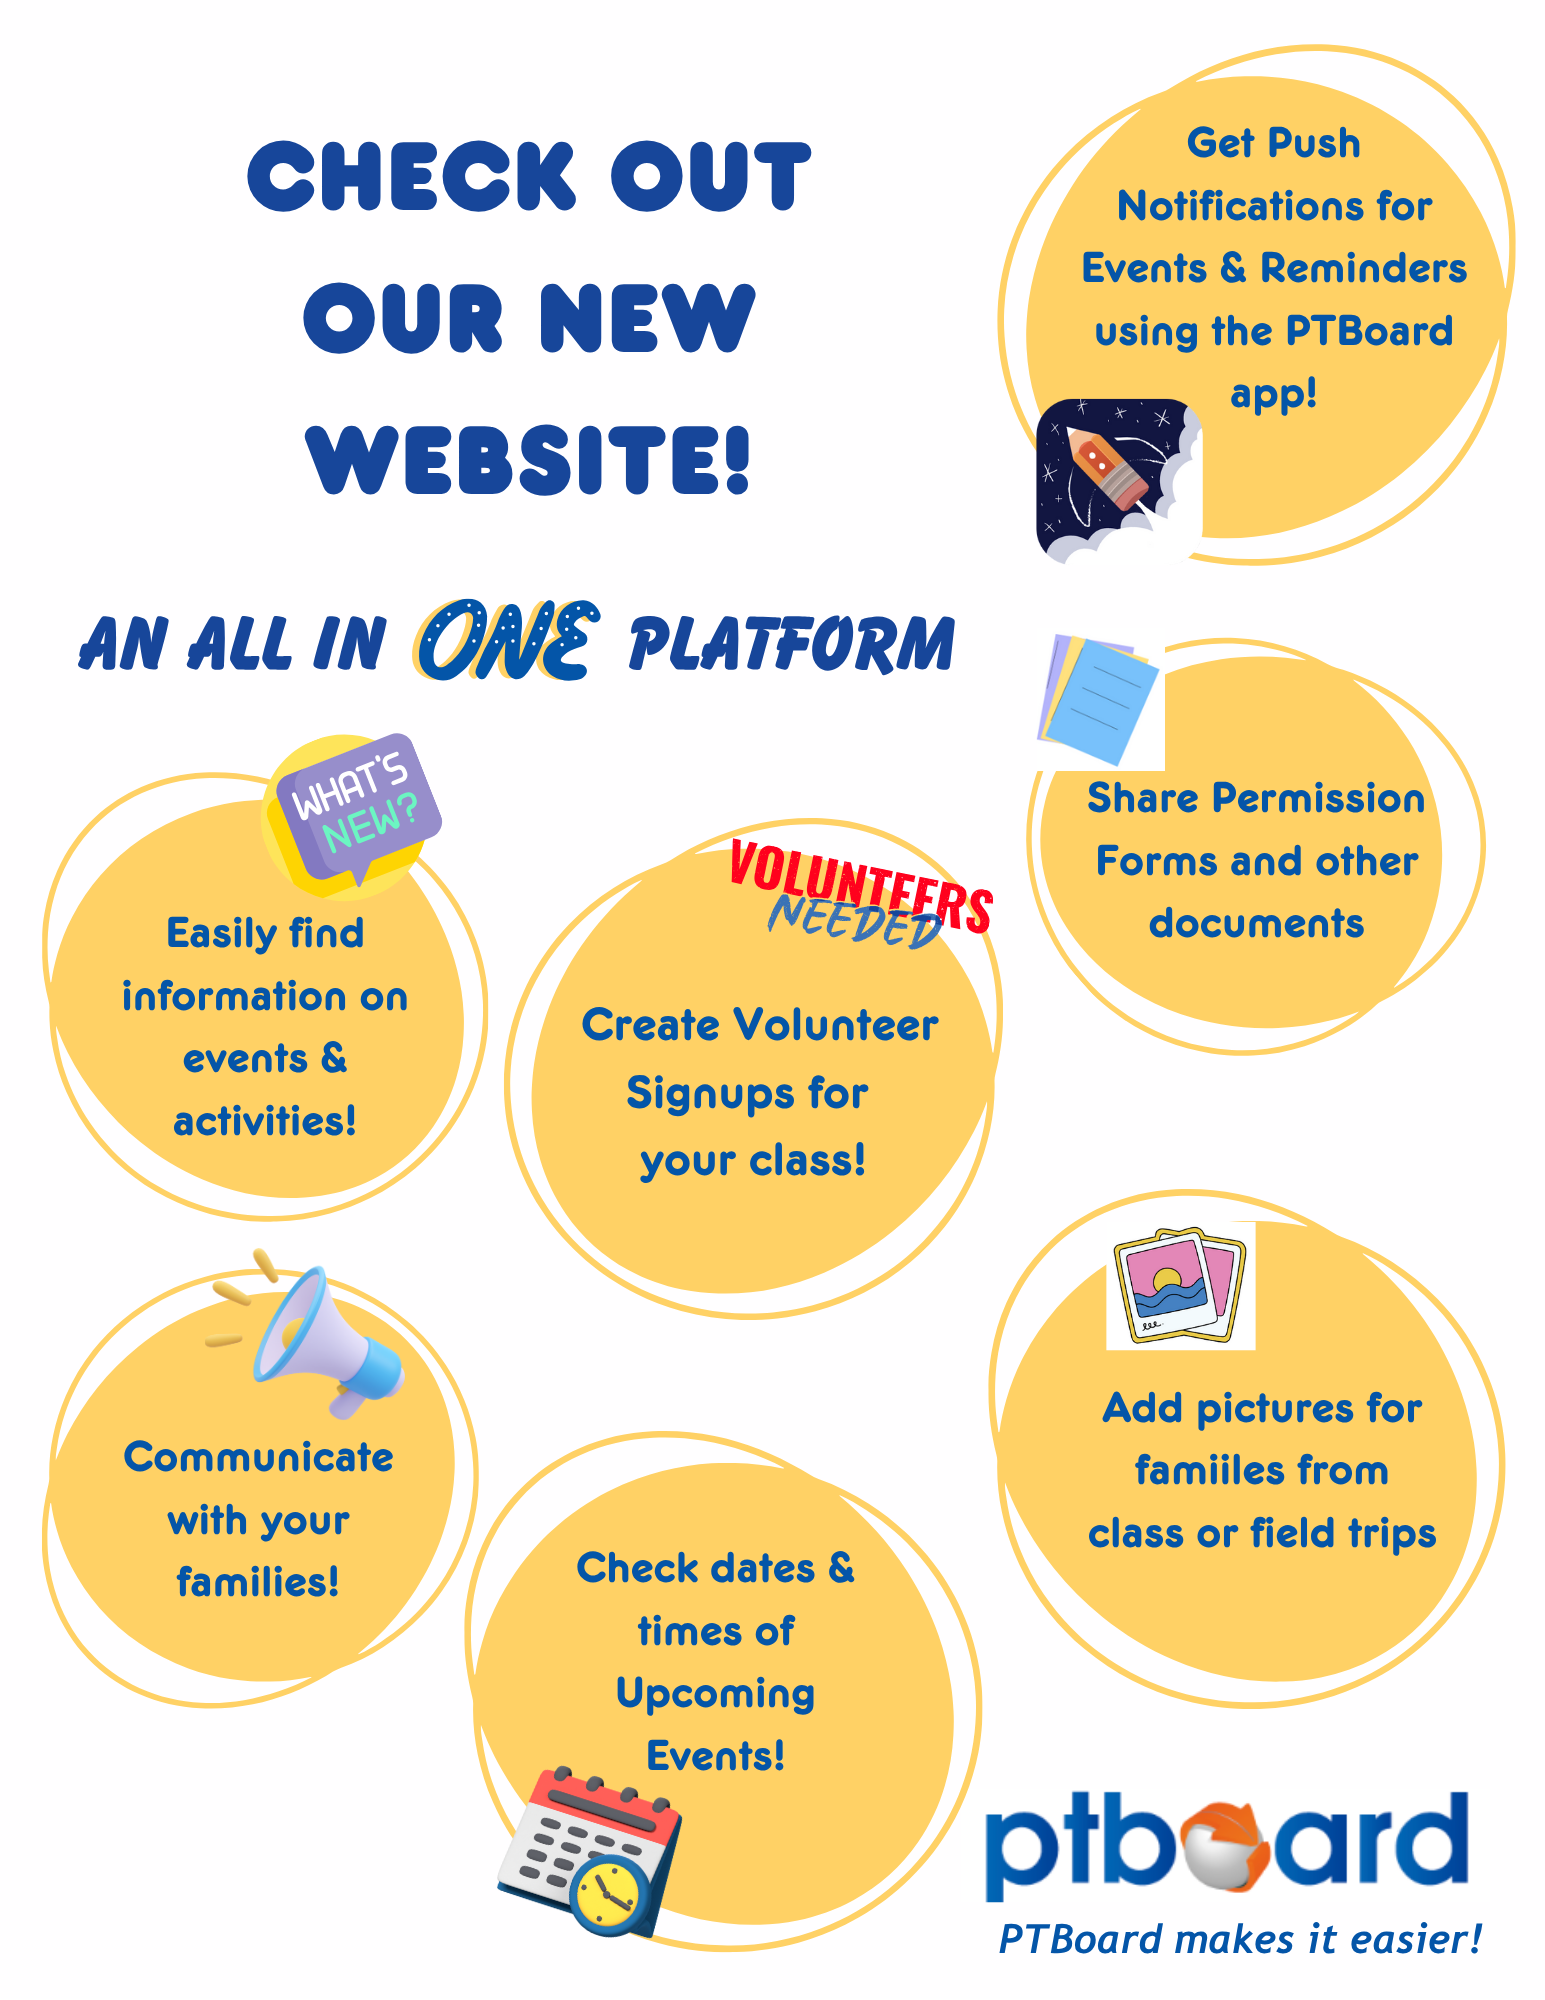
Use this flyer to send or give out to your Parents and Families to introduce PTBoard.
*JPG, PNG and PDF versions are attached below! If you would like to customize the flyer, please contact Andrea at andrea.maneval@ptboard.com to access the original Canva design.
-
PTBoard Flyer for Families .pdf
PTBoard Flyer for Families PDF
-
PTBoard Flyer for Families .png
PTBoard Flyer for Families PNG
-
PTBoard Flyer for Families .jpg
PTBoard Flyer for Families JPG
*JPG, PNG and PDF versions are attached below! If you would like to customize the flyer, please contact Andrea at andrea.maneval@ptboard.com to access the original Canva design.
-
PTBoard Flyer for Teachers - My Version.pdf
PTBoard Flyer for Teachers PDF
-
PTBoard Flyer for Teachers - My Version.png
PTBoard Flyer for Teachers PNG
-
PTBoard Flyer for Teachers - My Version.jpg
PTBoard Flyer for Teachers JPG